Search This Blog

Thursday, July 12, 2012

Pantry/Laundry Room Ideas

I've been looking at my pantry/laundry room, well, maybe not looking, avoiding looking, ignoring...and thinking that something must be done. I have hoarder tendencies inherited from the past two generations that I try desperately to fight. Sometimes it is a losing battle, but other times I pull up my big girl panties and get going.

Unfortunately, being an only child. I have some control issues. I must plan things out so that they work out exactly how I want them. So, my head is spinning with ideas. I would like to work on my pantry, but spend very little money. I guess I should tell you, our pantry/laundry room/mudroom/dog room is a pretty good size. This is great and not great. It is awesome to have so much room. It is not awesome when you use it as a catch all. I will add some pictures of it in all it's glory exactly as it is now. The embarassment this causes may prod me to get started.

Being an only child list maker, here is what needs to get done:
  1. Remove all items from the room.
  2. Lighten the load by getting rid of unused, outdated, items.
  3. Paint.
  4. Add a utility sink or cabinet with sink. Not sure yet. I'll check out the Habit for Humanity Restore, Craigslist, etc. and see what we can find there. A cabinet would be nice to hide the detergent and softener bottles.
  5. Add a counter top over my washer and dryer. Currently, I have nowhere to fold my laundry except on top of the w/d.
  6. Add some sort of broom closet and maybe some shelves/cabinets for beach and kitchen towels that are stored there.
  7. Flooring. This should maybe come first, but it may not be in the budget. The linoleum that is in there is gross.
  8. Some sort of cubby area to contain the dog crate and thereby containing the dog hair that our Golden Retriever, Breckin leaves floating around on an hourly basis.
  9. Do something with the nasty wire shelving. I found this and think it would be an easy, inexpensive solution at www.salvagesavvy.com where she used a drop cloth and linoleum tiles to make those wire shelves look better. See:http://www.salvagesavvy.com/2012/04/how-to-make-wire-shelving-look-function.html
  10. Baskets to organize pantry items.
  11. Decorative items.
Okay, now that I write this down, I am exhausted.

I vow to at least get started with the one thing that will cost me nothing. Getting rid of the junk and unneeded pantry items in there. Maybe moving things that don't belong there to their rightful places would help too. I walk into the room and I find tools, hats, etc. there. This will definitely take a while! Hmmm, maybe I should wait until winter when we have to be inside more???? It's tempting.

Saturday, April 14, 2012

I Ain't a Little Bit Country


These were bar stools I bought many moons ago at the old Value City Furniture. At the time I liked them because they had four legs that were in a square and I knew that I could easily change up the fabric on them. They spent some time with a neutral tropical fabric, but they needed some updating again. I took off the tropical fabric and ewwww, this was underneath. I had totally forgotten how hideous the original fabric was. I decided to paint them black and update it with this Ikat fabric I found and thought was kind of cool.


It was a quick update that looks so much better than the original country fabric and light wood. What do you think?

Wednesday, March 28, 2012

I Got Nothing

I Got Nothing...to say.
I Got Nothing...oh wait, I do have something to say. I figured that if I said that I had nothing to say it would trigger something in my brain because I always have something to say.

I will randomly say things that I love in no particular order. Why? Because I am usually pessimistic and say what I think even if it is negative. So, I am being positive today and naming my loves.

1) Ketchup or Catsup: Love it, favorite condiment ever. And, what the heck is Catsup anyway? Is that what felines say when they greet each other instead of "What's up?"

2) The Ocean: Love it. Love being by it, feeling the breeze blow off of it, but I am not too comfortable swimming in it. I just like to walk around and look at the tidal pools and animal life.

3) My husband: He is my rock, he keeps me sane, he listens to all my hairbrained ideas, he listens to me rant, and mostly because he tells me to go have some "me" time when he knows I am at my wit's end.

4) Puppies: Who doesn't love puppies? Those cute learning to walk, bologna breath cuties are irresistible.

5) My Oldest: He's creative, has a dry sense of humor, and is a handsome, freckle face like me.

6) My Girl: She's a beautiful, caring, sensitive child who will be a teenager soon. She is the best artist because she is constantly trying to perfect small aspects of her drawing.

7) My Baby Boy: He's a mama's boy and still admits it. He can be ornery and mean one moment and cuddly and kissy the next.

8) Carbohydrates: That's right. Pasta, bread, rice, potatoes, etc. I am trying to keep them on the lower side, but it is so difficult.

9) Driving Fast: I can't help it. I really wish I could just blink and I would have traveled to my destination. I just like to get places in a hurry.

10) Gardening: The idea that you can put a tiny seed into the ground and have it grow into a beautiful plant or bear fruit or blossom is just awesome.

11) Rain: the smell of fresh rain, okay, not all the time, but once in a while. Lovely.

12) Chasing my kids with bugs: It amazes me how my 2 younger children hate bugs and will run from them. I always thought that children were afraid of bugs because their mothers were. Well, not so. I have always tried to get them to hold bugs and I've told them how cute they are. Nope. They hate them. The other day, after a rain, we found a gigantic earthworm. I picked it up and chased after the two kids. They ran in the house and wouldn't come out.

That's fun. They were laughing and screaming and running. I guess another thing I love is laughing with my children!

Tuesday, February 14, 2012

Happy Valentine's Day

Ahh, Valentine's Day. The day when your true personality comes out. You are either really into it and expect something special. If you don't get something, you are extremely disappointed. You love all the cutesy aspects of it. This is for you:

Valentines Day

Or maybe you have no valentine to rely on, you just got dumped, or you feel that Valentine's is just a way for Hallmark, Godiva, and 1-800-Flowers to make money. Well, then, this is for you:


Or maybe you don't care what the day is, you just know that you received chocolate and that's all that matters. This is for you:


Any way you look at it, I just want to say...Happy Valentine's Day, or Happy Wednesday, or Happy Eat Chocolate Day!

Thursday, February 9, 2012

San Francisco

I haven't been to San Francisco for about 21 years! Sad, but true. I can't believe how things have changed there. When I was 7 years old, I lived there for a year. This is what happens to a Hawaii girl when her dad works for the airlines. You move when you have to. Anyway, at the time, besides me the only other Asian kid in my class, maybe even the school, was Jason. He was another airline kid. We were Asian, but we are both 3/4 Japanese and 1/4 white. Zoom forward to now...I think there are more Asians than any other group in the bay area.

So, on to our vacation. The sad truth is I hadn't seen my dad in 16 years. Not since my wedding day. It was about time. My two younger children had never met their grandfather, step-grandmother, aunt, or cousin. My Oldest was out in California last year and got to see everyone.

We got some great deals on airfare, so we pulled the kids out of school for a week. Oh, again about the school district. I received a letter today stating that they had to send one out when a child missed 10% or more of school attendance days. Maybe if their parents had all summer off like the teachers and most school staff, they could go on vacation then. Maybe we should just go to all year school to take care of that. What do you say school district?

We also got some hotel deals. We decided to split up our trip by staying 3 nights in the SF area, one night in Monterey, and 3 more nights in the SF area. We had an awesome time.

Yes, time for some lame-when-it's-not-you type photos. Did all the tourist stops: Fisherman's Wharf, Ghirardelli, Pier 39, Ripley's Believe It or Not, Alcatraz, Golden Gate Bridge, Muir Woods, Japan Town, Treasure Island, Santa Cruz, Monterey Bay Aquarium. The kids had a great time and want to go back soon. We had a good visit with my dad and family.


Can't forget a pic of the official bird of Fisherman's Wharf, the rat with wings, the squawking, annoying, seagull. Here is my attempt at getting as close as I could while walking backward and taking a self portrait. It didn't work that well.

A+ Mommy Gets an F

You know how sometimes you think you are going to be the A+ mommy and you have a great idea. So, you decide that you are going to create a fun Valentine's project for your child's classmates. Especially since the school district you are in has decided to remove any holiday enjoyment by not allowing any fun food for holidays or birthdays. Don't get me started on that one. That's right for birthdays they can bring a non-food item. The district suggests a pencil or sticker...woohoo! I'm sure my kid would be da bomb if he brought a sticker.

So, for Valentine's Day I suggested we make heart shaped crayons for the class. I got a box of crayons, we unwrapped them all, broke them, and put them into a heart shaped mold. They came out beautiful, see...


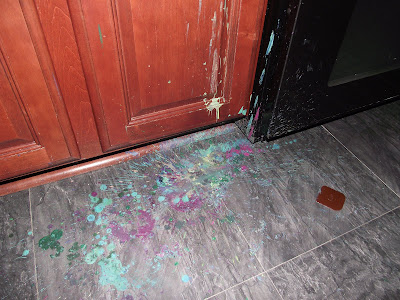
They came out really cute and colorful. We still need to put them on cards and prettify them for giving out on V-Day. But, a little known secret...these A+ Valentine's went F at home. The first batch turned out really cute. The second batch were on their way to cute. The oven timer went off, I got the oven mitts on, went to remove the mold, almost made it, and this happened.


Need a closer look?


Although you may be thinking that perhaps a rainbow pteradactyl came flying through my kitchen and pooped, it is really melted crayon wax all over my counter, cabinets, oven,and floor. Oh joy. I do have a tip for you though. If you are ever in this situation, this is how you get it out. You take a Pampered Chef scraper and get as much of it off as you can by scraping. Then you get an iron (I protected it with foil to avoid waxy clothes later) and some paper towels and iron the mess up. Someone else said brown paper bags work well also. When I got to the sections where the iron couldn't reach, I got a wet paper towel, ironed it, and used the steaming hot paper towel to re-melt the wax and wipe it up.

This was a slow process, but it worked. So, A+ craft, F for execution.

Saturday, January 14, 2012

Maki Sushi California Roll


Let's get this straight for all of you who, at the mention of sushi, say, "I'm not eating raw fish." Sushi is not raw fish. Sashimi (Japanese)is raw fish, poke (Hawaiian) is made from raw fish. Sushi is seasoned rice either rolled (maki) or shaped. Today, I will be talking about Maki Sushi. This is more of a Hawaiian style sushi. The rice is a little more flavorful than the Japanese type.

First, I have to give credit where it is due. This is my cousin, Rynie's recipe. Her name is pronounced Ree-Nee. I never understood for the longest time why her name was Rynie. I finally asked my mom one day and she said it was because it was short for KathRYN. I have a big family back in Hawaii. You see Rynie is my cousin, but she is really my mom's first cousin. Her father and my mom's mother were half siblings. I'm not totally sure what that makes us, perhaps first cousins once removed or whatever. In Hawaii, you're cousins. Heck, most of the time close family friends are considered cousins.

Back to the sushi. Rynie makes the best sushi. It is always so good. I can tell you right now, my sushi is never as good as her sushi. I try and people here think it's pretty good. There are a lot of options for filling these. The easiest for me is always a simple california roll with cucumber, crab or imitation crab, and avocado. It is the one that most people will eat. Back home maki sushi usually has shoyu tuna, kanpyo (Gourd strings), carrot, fried egg, cucumber, shrimp flakes, etc.

In the picture above, I made some of both for my friend's 40th birthday party. The first time you try and roll sushi, they will probably come out off centered, but keep trying. You have to practice to get them centered, the right amount of rice on the nori (dried seaweed), and the right tightness (is that a word?). Here's the recipe below.

Rynie's Sushi Rice

Ingredients:
6 cups of cooked Japanese (short grain)rice
sushi nori (dried seaweed)
filling ingredients

2/3 cup sugar
1 cup Japanese rice vinegar
2-1/2 tsp. salt

Heat the sugar, vinegar, and salt in a saucepan until the sugar is dissolved. Place the hot rice in a large bowl and gradually add the sushi sauce while constantly stirring the rice. You may need to add a little less. The rice should absorb the sauce and not be soupy. Add enough so the rice begins to stick together.

Using a bamboo sushi mat, place a sheet of nori on mat. Have a bowl of water handy at your rolling station. Place rice onto the nori and spread it evenly with your hands about 2/3 of the way down the nori. Keep your hands wet. This will help the rice from sticking to you. Add your fillings. Using the mat, roll the sushi. Hold the fillings toward the center of the mat while doing this. Moisten the end of the nori so it will stick together. This takes practice, but you can eat the mistakes!

You can either cut the rolls now with a sharp knife. If I am not serving it right away, I place each roll in waxed paper and then into a plastic bag. If you cut them and place them on a platter, cover them with a dampened paper towel to avoid them drying out. This usually makes about 6 rolls or 36-42 slices.

With a Cherry On Top

If you like it than you better put a cherry on it. If you like it than you better put a cherry on it. Uh, oh, oh, oh, oh...whatever, Beyonce. Anyway, made some Cherry Almond Bars the other day. I don't really like cherry anything much. I only like fresh cherries and even then I really don't like eating them because my fingers always get stained. I'm a little strange. I can't help it. My brain won't stop thinking of the what if's in life. Please, please make it stop.

Back to the cherries. They have never been my favorite thing, so in my ongoing quest to lose weight, I thought to myself, "Hmmm, if I make these cherry bar things, I won't eat too many because I don't like cherries." Eureka, I have found my diet secret. Make stuff that taste good to other people, but not to you. Voila, skinnyville here I come.

They make a huge 15x10 tray full so there was a lot. I took some to a party, some to the babysitter, and some to work. I was asked for the recipe a couple of times and today a guy from work said, "Oh, those were good. I only got to have one." I told him I would make more. I had only one, too. Cherries...remember...not my thing. Maybe it has to do with cherry being the only flavor of medicine when I was a kid. Here's a close up of them.

This is what they look like when they are out of the oven, cooled, and drizzled with the glaze.

Anyway, here's the recipe and a few tips. They are good. The middle section of mine was a little mushy. See.

I don't think there was enough batter on the bottom there and those darn cherries took over. They were not good enough to serve from this area. It was like a gory scene of a cherry homicide there. I am going to try these again and use a little less cherry filling. The almond extract added a nice flavor that complemented the cherries well.

Cherry Bars
from Taste of Home Baking Classics page 370 recipe from Jane Kamp of Grand Rapids, MI.

1 cup butter, softened
2 cups sugar
4 eggs
1 tsp. vanilla extract
1/4 tsp. almond extract
3 cups all purpose flour
1 tsp. salt
2 cans (21 oz) cherry pie filling

Glaze:
1 cup powdered sugar
1/2 tsp. vanilla extract
1/2 tsp. almond extract
2-3 Tblsp. milk

In a large bowl, cream butter and sugar until light and fluffy. Add eggs, one at a time, beating well after each addition. Beat in the extracts. Combine flour and salt; gradually add to the creamed mixture just until combined.

Spread 3 cups batter into a greased 15x10x1 inch baking pan. Spread with pie filling. Drop the remaining batter by teaspoonfuls over filling.

Bake at 350 degrees for 30-35 minutes or until a toothpick comes out clean. Cool on a wire rack. Combine glaze ingredients; drizzle over top. Cut into bars. Yield: 5 dozen.

*5 dozen is an exaggeration. Unless they cut them super small.

Peanut Butter Brownies

Looked through that Taste of Home Baking cookbook again and found a recipe for Peanut Butter Brownies.

Peanut butter, chocolate, cream cheese - what's not to like? Yes, I could've just bought a brownie mix, but where's the challenge in that? Instead I far exceeded the cost of a brownie mix. This brownie recipe called for 2 blocks of cream cheese.

And, in the end, I'm still not sure if it was more like a brownie with peanut butter cream cheese or a peanut butter cheesecake with a little brownie in it.

Here's what they looked like when they came out of the oven.

Pretty nice looking, huh? And, here is what they looked like on a plate.

How about a side view.

You know how brownies, cakes, and cookies all taste so, so good when they are warm and right out of the oven? Not with these. We all tasted a little when it was warm and we thought it really didn't have much of a peanut butter taste and they were just okay. Then, I put them in the refrigerator. That did the trick. When cold, these tasted like cheesecake.

I have a really good tip for you brownie bakers. You know when you try to cut brownies and your knife goes in and brings up a whole bunch of brownie with it. This always happens and you get a really gnarly looking brownie. Here is the trick. Drum roll, please? Use a PLASTIC KNIFE! That's right. One day I thought about how mochi is so sticky and you use a plastic knife to cut that, I wonder if it would work for brownies - and it totally worked.

Here's the recipe:
Peanut Butter Brownies from Taste of Home Baking Classics
3 eggs
1 cup butter, melted
2 tsp. vanilla extract
2 cups sugar
1-1/4 cups all purpose flour
3/4 cup baking cocoa
1/2 tsp. baking powder
1/4 tsp. salt
1 cup milk chocolate chips

Filling:
2 pkg. (8 oz. each) cream cheese, softened
1/2 cup creamy peanut butter
1/4 cup sugar
1 egg
2 Tbsp. milk

In a large mixing bowl, beat the eggs, butter, and vanilla until smooth. Combine the sugar, flour, cocoa, baking powder, and salt; gradually add to the egg mixture. Stir in chocolate chips. Set aside 1 cup for topping. Spread remaining batter into greased 9x13 baking pan.

In a small mixing bowl, beat the cream cheese, peanut butter, and sugar until smooth. Beat in egg and milk on low until just combined. Carefully spread over batter. Drop reserved batter by tablespoonfuls over filling. Cut through batter with a knife to swirl.

Bake at 350 degrees for 35-40 minutes or until a toothpick inserted in the center comes out clean. Cool on a wire rack. Chill until serving. Makes 3 dozen.

Char Siu Chicken Plate


Char Siu. In Hawaii, we all grew up eating this in so many ways. A few slices in your saimin, chopped up in fried rice, straight from the meat hook at the China Town roast pork and char siu man's stand, inside a manapua (char siu bao). I really have no idea what the correct pronunciation is of Char Siu. Growing up we all said, "Char Shoe." Doesn't sound very appetizing, does it?

For those of you that aren't in the know - char siu is the pork many Chinese restaurants use in their Roast Pork Fried Rice. It is red on the outside from the tons of food coloring that goes into it. In Hawaii and anywhere else there is a China Town, you can get Char Siu and Roast Pork by the pound. Here, 40 miles away from Chicago, good luck.

I never even thought of making Char Siu myself. Fortunately, our friends, C&C, that live about 30 minutes away from us and are also Hawaii born made this Char Siu Chicken for us once and we have been making it ever since.

Here's an interesting story, we met C&C at a Japanese restaurant in Naperville, IL about 11 years ago. We were waiting for our table and I saw this Japanese guy and his little girl walk up to get some mints at the front counter. My husband and I looked at each other. I said,"They're from Hawaii." My husband said, "Oh, because of his shirt." C was wearing a Crazy Shirt with a gecko on it. I said, "No, I heard him talk."

So, as C&C and their 5-year-old daughter E were leaving I said, "Eh, you from Hawaii?" We started with the usual questions: What high school did you got to and what year did you graduate? Where did you grow up? and so on. Of course, like every local person, you make connections. C went to high school with my cousin at Kaimuki High School. And, that was the start of a great friendship. In fact, they were in Hawaii this past New Year's Day and came to my grandpa's house in Manoa to join us for lunch. Crazy, small world, isn't it?

We are grateful that we met them. They are good friends, C loves beer as much as my husband, but the best part of having them for friends is we go the Char Siu recipe. Just kidding. After getting the recipe, I realized that I had the cookbook this recipe was in for years, but had never tried it. You can make this using pork also, but the chicken is great to throw on the grill. See how much I've lost my pidgin - I meant to say on the - hibachi.

We find that for the most ono results you need to soak the chicken for at least 2 days. I use boneless, skinless chicken thighs I get from Costco. I have also used boneless, skinless chicken breasts. They are, as you would expect, a little drier, but still good. Oh, and if you want, you can always add red food coloring to make it look more Char Siu-y.

First make the sauce.

Place your chicken in a zip top bag, close it well, and place in a bowl just in case it leaks. Refrigerate for 24-48 hours. (48 is best). Flip the bag every once in a while to make sure the sauce coats all the chicken well.


Grill until perfectly charred and caramelized. Serve up with some white rice and veggies. Grind!

Char Siu Sauce (from Taste of Aloha)
1 cup brown sugar
1/4 cup soy sauce (shoyu)
1/2 tsp. sesame oil
1/8 tsp. Chinese Five Spice
1 clove garlic, minced
2 tsp. sherry
1 tbsp. Hoisin sauce
1 tbsp. red food coloring (optional)

Mix all ingredients thoroughly. Marinate meat 24-48 hours and grill. You may also bake your pork, chicken, or spareribs at 350 degrees. 1 hour for chicken and pork. 30 minutes for spareribs.

* I usually make a double recipe to soak my chicken. This ensures that each piece is well coated.

Almond Apricot Bread

Post written last year after our snowmaggedon of 2011.

Last week we had one of the worst blizzards, since I have lived in Illinois. I have to say being a Midwesterner for almost 16 years, I do know so much more about snow. Of course, when the blizzard hit us last week and we got over 20 inches of snow, our snowblower wouldn't start - again!

While the hubby was at work, my oldest son and I went out and started clearing snow. One of my wonderful neighbors - we are lucky to have many - came over and helped out with his snowblower. I am all about showing my appreciation for these acts of kindness. I really think he loves snowblowing because he did the sidewalk and our driveway - hooray! I decided I needed to bake something for him and his family. I looked through my Taste of Home Baking Classics Cookbook. It was only $12 at Costco. And, why do asians like a bargain so much? I won't see any asians for a while and then - boom - I go to Costco or the outlet mall and they are all there.

Whatever, I found the recipe I wanted to try. Almond Apricot Bread. It sounds interesting and easy. I run to the store because I have no dried apricots and absolutely no apricot baby food. Thank goodness, no more babies here. Of course, there is only one choice for baby food, an apple apricot. That'll do.

It came out nice looking.

The recipe was simple and the bread looked pretty when it was done. Here's the recipe:

Apricot Almond Bread
2-1/2 cups all-purpose flour
1/2 cup sugar
1/2 cup packed brown sugar
3 tsp. baking powder
1 tsp. salt
1 (7 oz.) apricot baby food (or similar)
1 egg
3/4 cup plus 1 tsp. milk, divided
3 Tbsp. canola oil
1-1/8 tsp. almond extract, divided
2/3 cup sliced almonds, coarsely chopped
1/2 cup diced dried apricots
1/2 cup powdered sugar

In a large bowl,combine the flour, sugars, baking powder, and salt. Set aside 1 tablespoon of baby food for glaze. In another bowl, beat the egg, 3/4 cup mil, oil, 1 tsp. almond extract, and remaining baby food. Stir into flour mixture just until moistened. Fold in almonds and apricots.

Pour into greased 9x5x3 inch loaf pan. Bake at 350 degrees for 55-65 minutes or until a toothpick inserted near the center comes out clean. Cool for 10 minutes before removing from the pan to a wire rack to cool completely.

For glaze, combine the powdered sugar, reserved baby food, remaining milk, and extract until smooth. Drizzle over cooled bread. Yield: 1 loaf (16 slices).


Those must have been some small slices because there was no way we got 16 out of one loaf. See all those little pieces of almond and apricot? Scarily, this reminds me of a fruitcake.


Obviously, I made two loaves one for the neighbor and one for us. Looks like someone was ready for a bite!

Chicken Katsu Plate Lunch

Chicken Katsu is a standard plate lunch offering. Most of the fine dining establishments that serve plate lunches offer it as a choice for your entree. And, when I say fine dining, I mean anywhere that serves you lunch on a paper plate or in a styrofoam lunch container with a plastic fork and knife.

Speaking of plate lunch serving ware - does anyone else totally miss the paper plate inside a box? Remember, when every plate lunch you got came on a paper plate, not styrofoam and it was in a bakery style box. I just remember the awe I felt when I opened the top of that box to reveal the treasure inside. Whether it was teriyaki on a bed of cabbage, chili and a hot dog, teri chicken, a veal cutlet drenched in rich, brown gravy. Save me - I could go on and on. The problem is that if I go on and on, I will add pounds and pounds onto my under 5 foot frame.

So, back to the Chicken Katsu plate. Here in Illinois - I have three choices: 1) I can go to the very big Japanese store, Mitsuwa, about 30 minutes away and go to their food court for a Japanese style Chicken Katsu. 2) I can drive to Chicago, about an hour away on a good day, where there is an actual place that serves mediocre plate lunches, 3) I can make Chicken Katsu, rice, and macaroni salad at home with my own two little hands.

Today, I chose the third option because it is just too crazy cold to be driving all over for a taste of Chicken Katsu. Besides, my homemade plate lunch tastes better than the other two options. Usually, I make my Chicken Katsu with the 3-step battering approach. Flour, egg wash (egg diluted with a little water), and then panko (Japanese breadcrumbs). This time I decided to try a recipe that is supposed to be L&L Drive-Inn's. This recipe is from the By Request - The Search for Hawaii's Greatest Recipes cookbook from Betty Shimabukuro. I bought this cookbook on our latest visit to Honolulu. I have to tell you why I bought it.

It includes a request I made to her about 7 years ago for the Kapiolani Bakery Prune Cake Recipe. It is on pages 120 & 121 of the cookbook. She should've asked me, I would've let her use my name. This prune cake recipe is not the right one though. I recently found another one that I am going to try. I have to tell you that I have the proof that it is me. I have the article cut from the paper and it still comes up on an internet search. So, enter my name and prune cake and you will find it. Sad, but true, I am associated in the world wide web with prune cake. Back to the Katsu.


The Close Up:


L&L Chicken Katsu
15 to 20 chicken thighs, boned and skinned (I use chicken breasts)
1 pound panko

Batter:
2 eggs
3/4 cup cornstarch
1/4 tsp. each salt, white pepper, garlic powder
1 cup water

Katsu Sauce:
1/4 cup Worcestershire sauce
1/2 cup ketchup
1/2 cup sugar
1-1/4 cups water
1/4 tsp. salt
1/8 tsp. each chicken bouillon, white pepper, garlic pepper
dash of Tabasco sauce

Preheat oil to 325 degrees.

Open the chicken thighs and flatten. (This is where I do things differently because I am lazy.) I just cut the chicken horizontally into thinner pieces. I also use chicken breasts because my kids prefer them and they are a little healthier. Like it matters when it is deep fried.

Combine batter ingredients. Coat chicken in batter, then in panko. Fry in oil until golden brown and crispy.

To make Katsu Sauce: Combine all ingredients and bring to a boil. To thicken, add a small amount of cornstarch dissolved in water. (I did not do this. I just cooked it down until it was thick.) Chill.


L&L Katsu Sauce:


Mom's Katsu Sauce Recipe:


To make my Mom's Katsu Sauce:
1/3 cup A-1 Steak Sauce
2 tsp. ketchup (she spells it catsup)
1 tsp. shoyu (soy sauce for the haoles)
2 tsp. sugar
dash of pepper
dash of hot pepper sauce

Mix all ingredients together.


The one on the left is the L&L and my mom's recipe is on the right:


So, we had to do a taste test. We tried our usual Katsu sauce recipe from my mom and the L&L Sauce. The L&L sauce is much sweeter. Mom's is much more A-1 based. Since my little guy could take A-1 intravenously, he likes mom's better. The rest of us couldn't decide. They are both so different. Mom's is much easier because it does not require any cooking. You can do your own taste test.

As for the katsu, I think I will go back to my way salt and pepper the chicken then dip in flour, egg wash, and panko. The panko seems to love the chicken more. It hangs on for dear life. The L&L stayed on also, but required more ingredients and time. And,in the end, there isn't much of a taste difference.

By the way, this homemade plate lunch also included, what I like to call, my Lazy Okole Mac Salad. By the way - I usually use another word for okole that rhymes with pass, gas, and bypass. Heehee. All I do to make this is boil up some macaroni, drain, add some grated carrot, salt, pepper, and Best Foods (Hellmann's) mayonnaise. And, I insist on Best Foods or Hellmann's -depending where you live.

So, go cook up your own Katsu! I am already thinking of the next plate lunch. Maybe - Korean - yes, Meat Juhn or Kal Bi with Bean Sprout Namul. While I am thinking of the next plate lunch my hubby and the two younger ones have been stricken with too much Chicken Katsu...just look at them.

Almost Guri Guri

GURI GURI....mmmm. Remember that creamy sherbet-like cold treat from Maui. You could only get it by going to Tasaka's Guri Guri in Wailuku or someone would have to bring some to you. They always packed it up in those Chinese take out style containers and packed it for you to take back to Honolulu. Only two flavors were ever available strawberry (my favorite) or pineapple (wouldn't turn it down).

So, how do you get Guri Guri when you are 5,000 miles away in very cold Illinois? Guri Guri is cold and so is my okole right now. Honestly, last year at this time, I was in Honolulu and it was about 90 degrees warmer than it will be here today. While we were there, we did have a knock off Guri Guri that they sell at Longs Drugs. It was pretty good and came in different flavors like Chocolate Haupia, Strawberry Vanilla, and Strawberry Banana. I can't remember the brand, but they were packaged in small plastic containers with the cardboard disk top with the little tab to remove it. Anything you eat with a wooden spoon in a little cup can't be that bad, right?

Back to my point, I need to make my own Guri Guri. Here is the first recipe I tried:

GURI GURI#1
2 (12 oz.) cans of strawberry soda
1 (12 oz.) can of 7 up
1 (14 oz.) can of sweetened condensed milk

The first and most important thing you need to do is make sure you have enough room in your freezer to fit the bowl you are using. Then, mix all the ingredients in a large bowl. Place the bowl in the freezer for a 2-3 hours. If you are like me, make that 4 or 5 hours, because you tend to forget. Go back and give it a stir. Unless you are like me again and forget, then when you go back it'll be 4-5 hours later and you'll think that it is totally frozen already, so you proceed to shove your spoon into it and find that only the top inch is frozen. This causes you to plunge into the liquid portion and it splashes all over your face. Not a good look. So, don't be like me. After your first stirring that should happen at the 2-3 hour mark, leave it overnight. The next day, stir it up and serve.


Looks pretty yummy.


Grab a spoon. Preferably a cow handled spoon because the cow is happy you used sweetened condensed milk.


See the cow is smiling.

My rating on this: Good, not like Tasaka's, a little too sweet for me. The kids thought it was good, but not great. If you have another version that you think gives Tasaka Guri Guri a run for their money, let me know and I will try it out.

Lost My Pidgin Blog Combined

I decided to move my other blog, Lost My Pidgin, and combine it with this one. This is the reason for the name of the blog.

Transplanted locals...we are everywhere. We grew up in Hawaii, but for different reasons we have ended up far away from our island home. We are a distinct bunch. We remember things like picking mangoes with a long stick with a bag on the end, picking limu in the ocean, catching crayfish in the stream, telling potagee jokes, going to Magic Island for picnics, eating Matsumoto's shave ice, Leonard's malasadas, and Rainbow Drive-In plate lunches.


We wore rubber slippers before they were flip flops and we can think of many uses for them. We can swat a fly, kill a kaka roach, or gather a bunch of slippers and make a starting line for a race. We know how to get the little nub shoved into the hole when someone steps on the back of our slippers and makes it come apart. We know that you never wear your "good" slippers to a party because if someone leaves before you, they might take your "good" slippers.

We know the meaning of li' dat, da kine, hanabata, hammajang, and uji. Unfortunately, many of us live far away now and when we say things like li' dat, da kine, hanabata, hammajang, and uji, they just don't sound right. For me at least, I know that I have somehow LOST MY PIDGIN.

In an effort to maintain my localness, I have decided to assist transplanted locals like me. I will be posting my thoughts about being a local girl on the mainland. I'll also post recipes because we all know that sometimes it isn't easy finding kalua pig, malasadas, and coco puffs when you are so far from home. You probably have an easier time if you are on the west coast where there is an abundance of locals, but here in the midwest and other areas, it isn't as easy.

So, join me on my quest to bring some local style food, fun, and aloha to the mainland.